
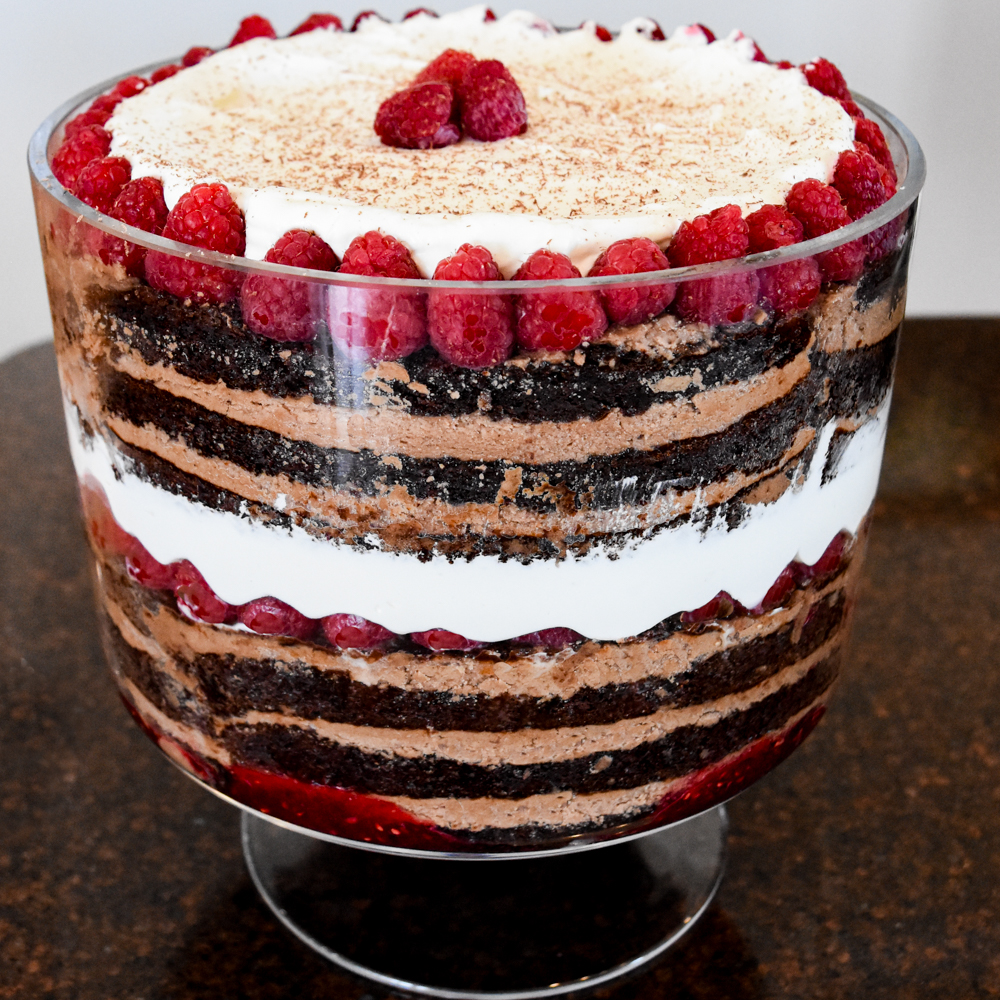

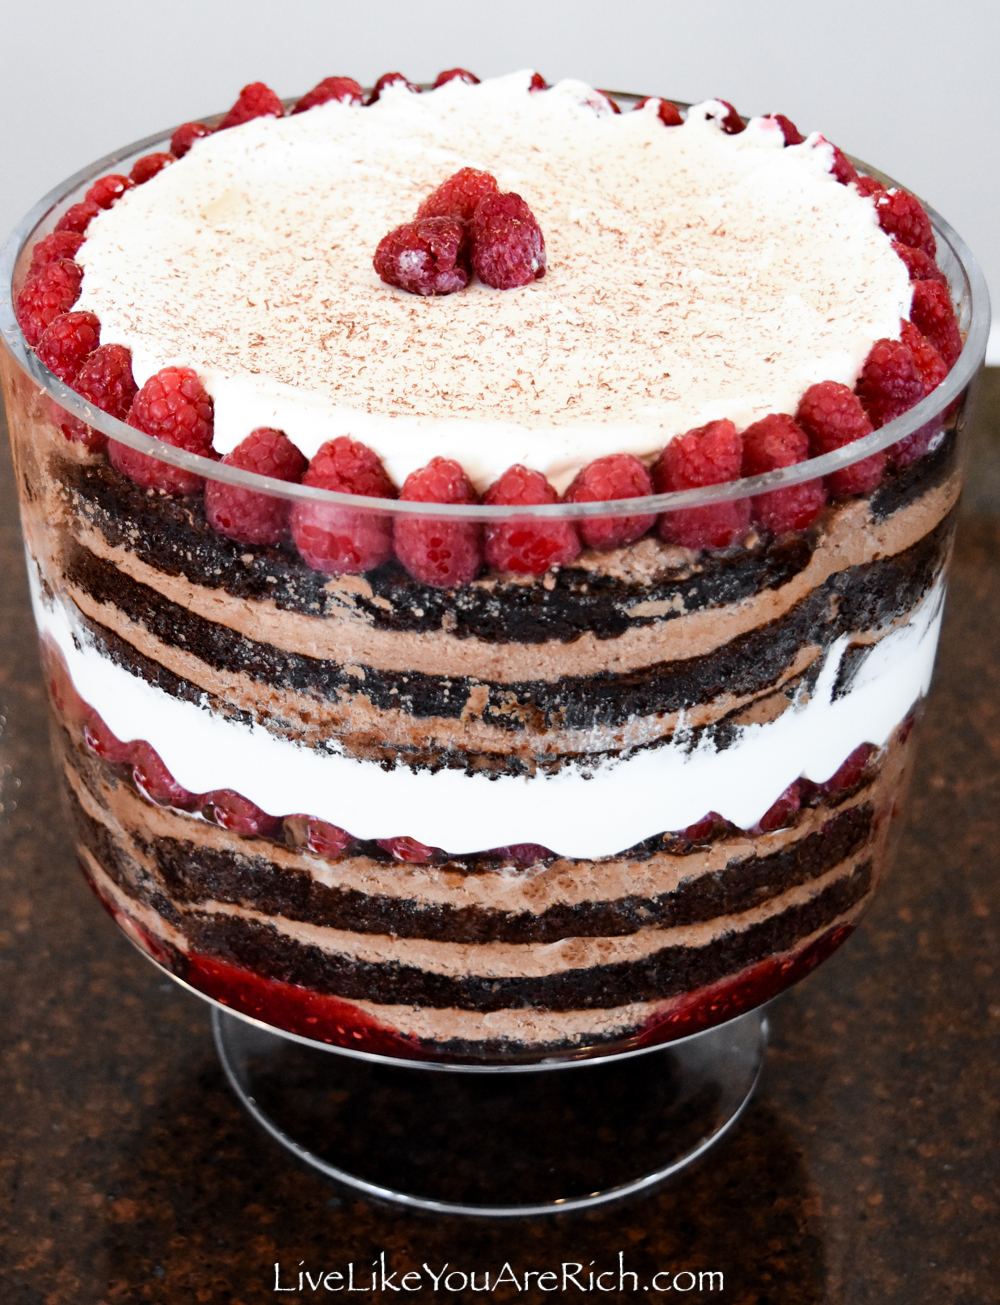
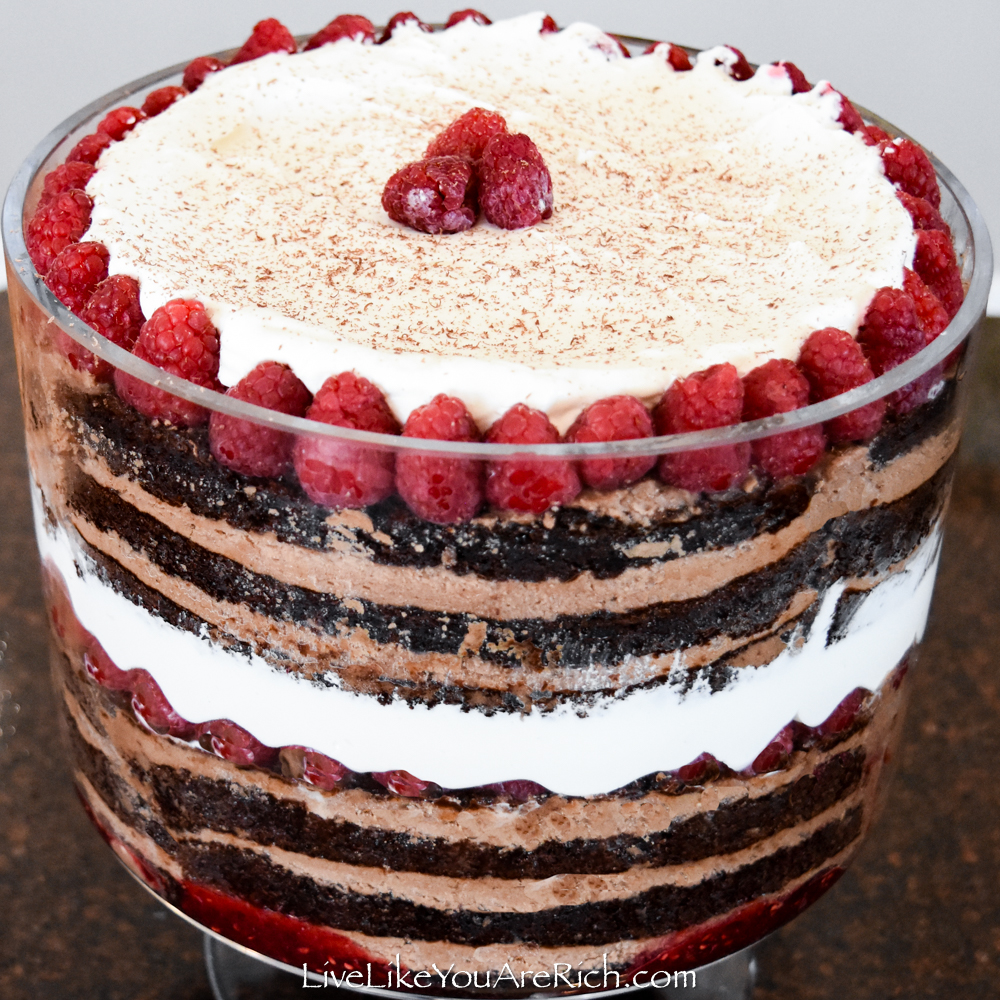
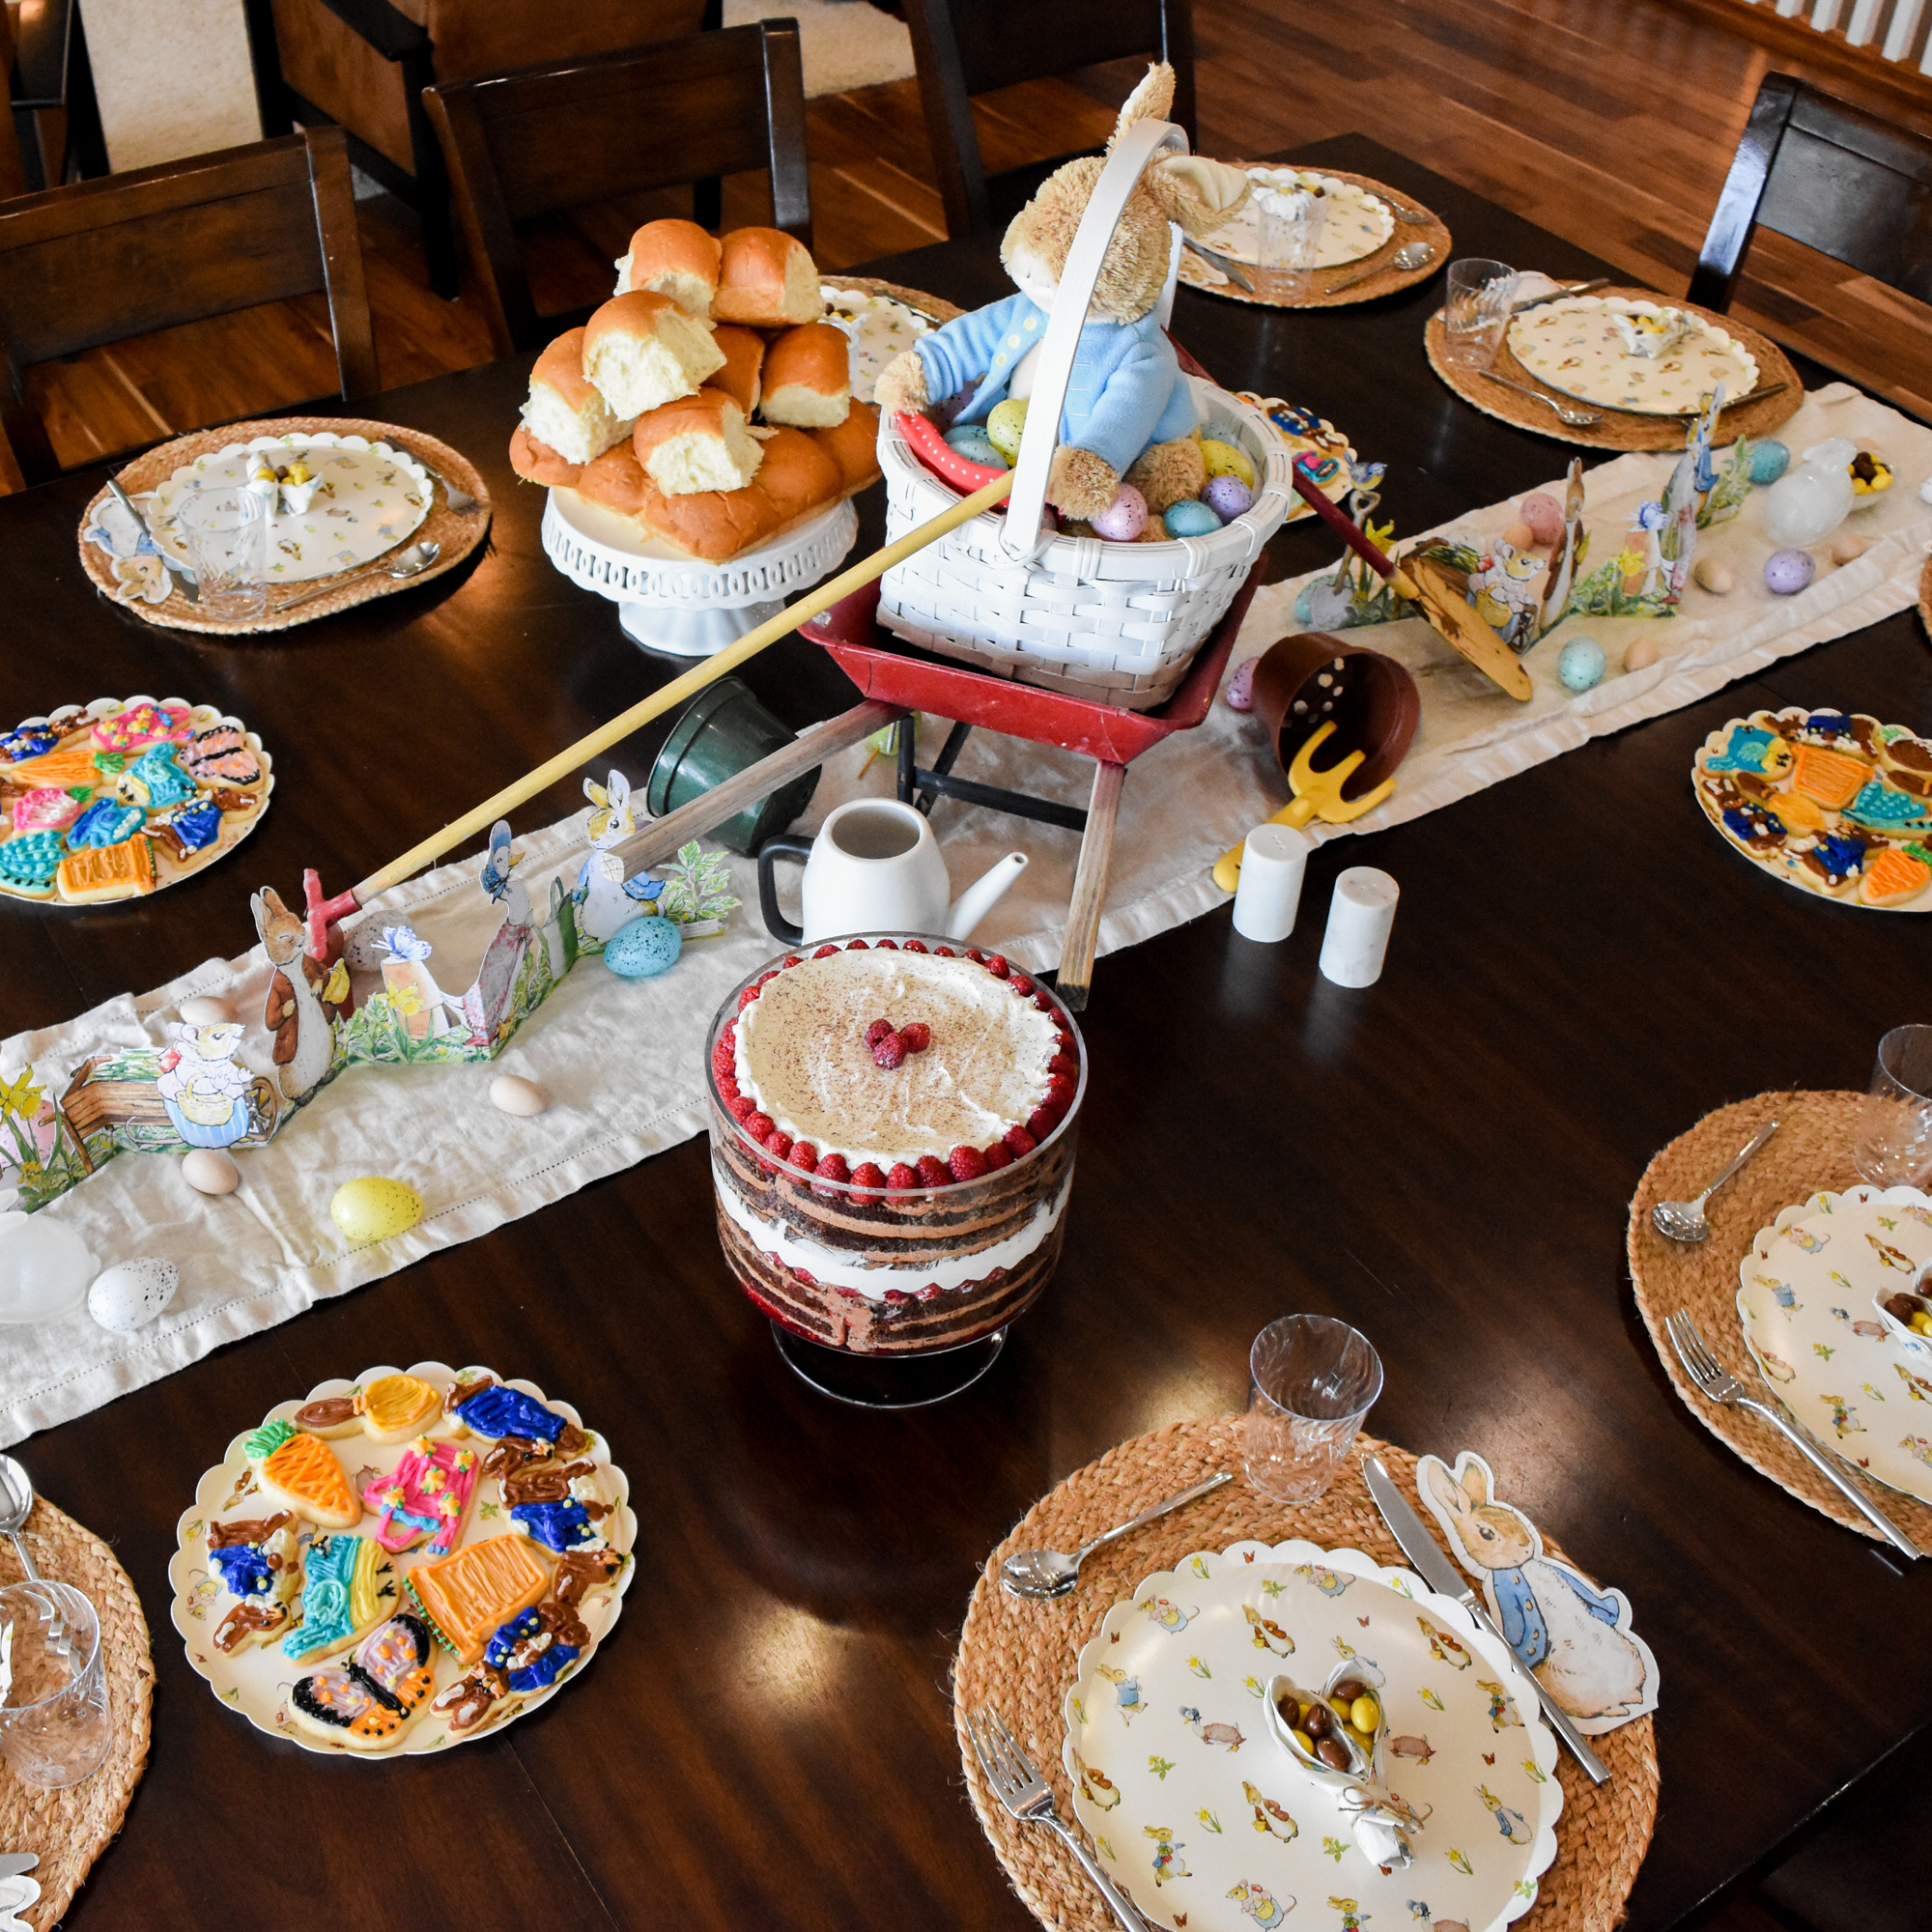
Chocolate Raspberry Cake Trifle
I love chocolate and raspberries. I also love trifle. I wasn’t happy with the way my homemade chocolate six-layer cake with chocolate buttercream turned out. In fact, it was a sorry excuse for a cake. I decided to deconstruct it and make something more beautiful by turning it into a trifle.

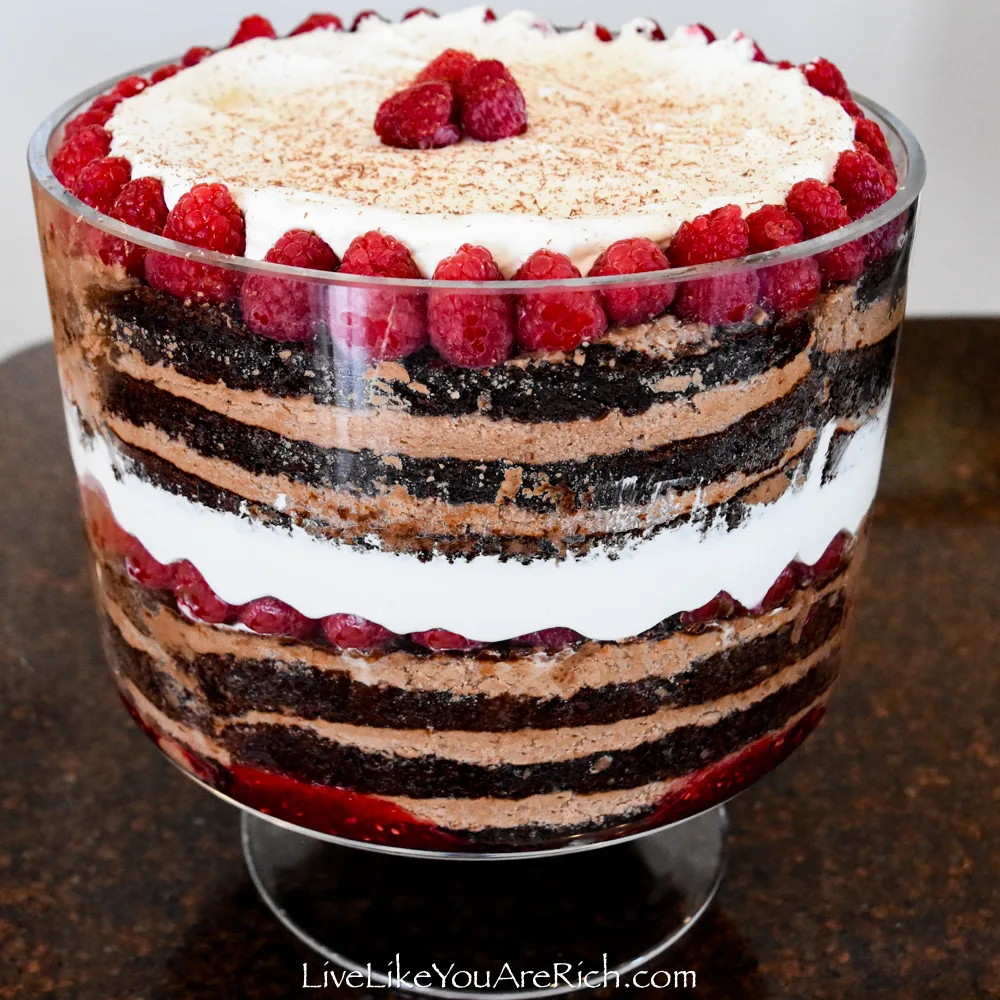
Trifles make beautiful and classy desserts and while I have never deconstructed a layered cake and turned it into a trifle, I thought it would look really pretty to do so.

This dessert makes a big impact and is sure to get compliments just because of its presentation. It tastes absolutely delicious as well.
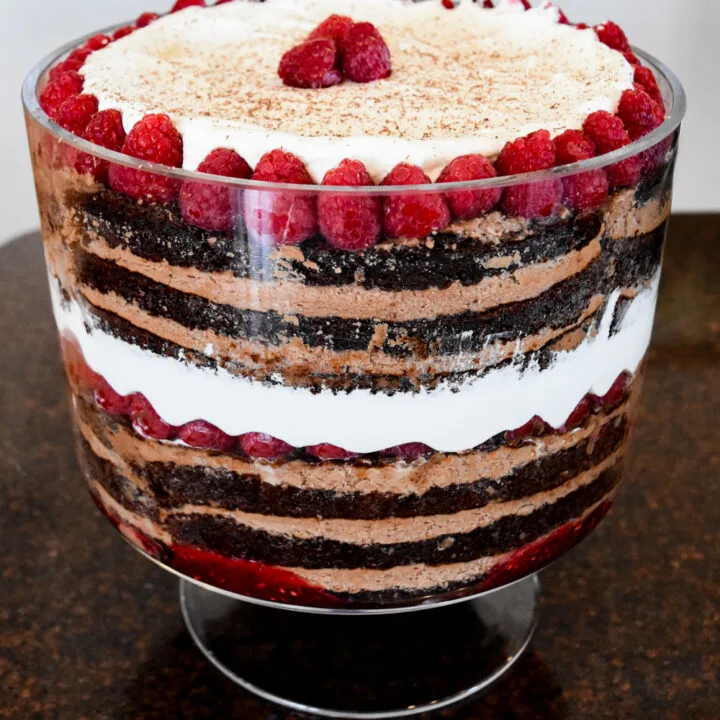
The tartness of the raspberries and the low sugar in the whipping cream make it less sweet and help to balance the sweetness of the cake and chocolate frosting.
It was delicious!
My only regret was that I did not have enough raspberries. I had to put some blackberries in to fill it out. The blackberries tasted delicious I just wished I could have used more raspberries…so I have doubled the amount of raspberries I had in the recipe below.
Ingredients of Chocolate Raspberry Cake Trifle
Sweet Cream Vanilla Sauce Topping Recipe
- 1/3 Cup sugar
- 2 Cup heavy whipping cream
- 1/2 Tablespoon Vanilla (use clear vanilla if you want the cream to remain very white)
Fruit
- Raspberries 24-36 oz (minimum—the more the better). You can fill the layers in with other berries such as blackberries, strawberries, etc.
Cake
- Ingredients for this Chocolate cake recipe (coming soon). I did not film this recipe so I will remake it soon and post it.
Frosting
- Ingredients for this chocolate buttercream frosting. I did not film this recipe so I will remake it soon and post it.
Raspberry Jam
A small grated chocolate bar for garnish
- Small chocolate bar for grating garnish (optional)

Supply List for this Chocolate Raspberry Cake Trifle
knife
and of course the supplies for the recipes needed to make this trifle (mixer for frosting and cake, cake pan, etc.)
How to put together this Chocolate Raspberry Cake Trifle
Watch the video, print the recipe card, and/or continue reading.
1- Bake the doubled chocolate cake recipe to make 2 large 8-9″ rounds. Once completely cooled (even to an almost-frozen temp helps cut the cake better. Cut the cakes into 3 layers with a cake leveler or serrated knife. You’ll need these to make a 6-layered cake.
2- Mix up the full chocolate buttercream frosting recipe linked above and in the recipe card.
3- Frost and layer the cake—leave the sides naked. In the video, you see that I pull off the frosting that is on the outside of my chocolate layered cake as that frosting is unneeded and actually unwanted for this trifle. So just frost in between the layers. Freeze it completely.
4- Take the cake out of the freezer once it is frozen (it is much easier to work with frozen) and while it is defrosting slightly so you can cut through it…
5- Whip up the vanilla whipping cream recipe above. Wash and thoroughly dry the berries. Get out freezer jam or raspberry preserves (Bonne Maman is my favorite preserve brand and can be found in most grocery stores).
6- Spread freezer jam in the bottom of a trifle dish this adds a bit of red at the bottom of the dish which I like the continuity it brings to the dish.
7- Cut the round cake in half and then cut it in 1/2 height-wise (3 layers of cake should be on each half). See the video if this is confusing.
8- Cut about a 1/2″ wide slice from the middle and begin lining the side of the dish with the layered cake slices. Go around the perimeter and then put the cake on the button of the trifle dish. You can watch the video if these directions are confusing.
9- Spread raspberry jam on top of the bottom layer of cake. The order I used in the middle of the trifle bowl was: Jam on the bottom, then the order began and continued: cake, jam, berries, whipping cream, berries, cake, jam, berries, whipping cream, berries, cake, etc.
10- Sprinkle raspberries or other berries over the bottom layer. I wish I had more to use but I didn’t. So I’d recommend buying more than you think you’ll need.
11- Line the perimeter of the cake with raspberries standing in a row. The order I used for the side/perimeter of this cake trifle was: jam on the bottom: 3 layers of chocolate and frosting cake around the rim/perimeter, raspberries stacked on top of the cake going around the perimeter of the trifle bowl, whipping cream, 3 layers of chocolate and frosting cake around the rim/perimeter, raspberries stacked on top of the cake going around the perimeter of the trifle bowl, whipping cream garnish.
12- Spoon the whipping cream into the dish.
13- Place another layer of cake into the dish.
14- Spread Jame
15- If you have enough fruit do another layer of fruit.
16- Spoon in whipping cream to form another layer.
17- Stop once in a while to clean the inside of the trifle dish so that it looks clean and clear.
18- Add another layer of cake above the whipping cream layer around the perimeter of the trifle dish.
19- Fill this layer of whipping cream with berries. As mentioned I didn’t have enough raspberries as I just created this dessert off the cuff, so I used blackberries to fill this layer. They did taste great so adding blackberries is an option to add additional flavor to this dish.
20- Fill the middle with another layer of cake.
21- Cover the cake with jam.
22- Before adding the whipping cream, line the top perimeter cake with raspberries.
23- Add berries and whipping cream then chocolate cake then jam, berries, and whipping cream.
23- Make sure to carefully spoon the top layer of whipping cream in so it looks nice.
24- Garnish with a few raspberries and grated chocolate.
Note- Also, you may notice in the video that I’m taking off some frosting. This is because once I decided to make a layered cake trifle I worried about it being too rich. So where it made sense I did remove some frosting. When you make your layered chocolate cake leave the outside unfrosted/naked.
That’s it. While it sounds confusing if you watch the video you will see that it is simply cutting and layering—which is easy.
This also may seem very time-consuming. I won’t lie it is.
However, if you spread it out over a few days (bake the cake one day and allow it to cool, frost it another day and freeze it, then pull it out of the freezer and whip up the whipped topping and assemble the third day) it will not be so difficult.
This is what I did and it was not overwhelming.
As mentioned my guests, husband, and kids were pretty wowed by it.
It tasted delicious as well. It was worth the time and effort I put into it.

Chocolate Raspberry Cake Trifle
A statement dessert that pairs a moist chocolate cake, and creamy chocolate buttercream with raspberry preserves, berries, and a not-too-sweet whipped topping— making a delicious cake trifle.
Ingredients
- Sweet Cream Vanilla Sauce Topping Recipe
- 1/3 Cup sugar
- 2 Cup heavy whipping cream
- 1/2 Tablespoon Vanilla (use clear vanilla if you want the cream to remain very white)
- Fruit
- Raspberries 24-36 oz (minimum—the more the better). You can fill the layers in with other berries such as blackberries, strawberries, etc.
- Cake
- Ingredients for this Chocolate cake recipe (coming soon). I did not film this recipe so I will remake it soon and post it.
- Ingredients for this frosting recipe found at: https://livelikeyouarerich.com/the-best-chocolate-buttercream-frosting-recipe/
- Raspberry Jam
- Raspberry freezer jam
- A small grated chocolate bar for garnish
- Small chocolate bar for grating garnish (optional)
Instructions
1- Bake the doubled chocolate cake recipe to make 2 large 8-9" rounds. Once completely cooled (even to an almost-frozen temp helps cut the cake better. Cut the cakes into 3 layers with a cake leveler or serrated knife. You'll need these to make a 6-layered cake.
2- Mix up the full chocolate buttercream frosting recipe linked above and in the recipe card.
3- Frost and layer the cake—leave the sides naked. In the video, you see that I pull off the frosting that is on the outside of my chocolate layered cake as that frosting is unneeded and actually unwanted for this trifle. So just frost in between the layers. Freeze it completely.
4- Take the cake out of the freezer once it is frozen (it is much easier to work with frozen) and while it is defrosting slightly so you can cut through it...
5- Whip up the vanilla whipping cream recipe above. Wash and thoroughly dry the berries. Get out freezer jam or raspberry preserves (Bonne Maman is my favorite preserve brand and can be found in most grocery stores).
6- Spread freezer jam in the bottom of a trifle dish this adds a bit of red at the bottom of the dish which I like the continuity it brings to the dish.
7- Cut the round cake in half and then cut it in 1/2 height-wise (3 layers of cake should be on each half). See the video if this is confusing.
8- Cut about a 1/2" wide slice from the middle and begin lining the side of the dish with the layered cake slices. Go around the perimeter and then put the cake on the button of the trifle dish. You can watch the video if these directions are confusing.
9- Spread raspberry jam on top of the bottom layer of cake. The order I used in the middle of the trifle bowl was: Jam on the bottom, then the order began and continued: cake, jam, berries, whipping cream, berries, cake, jam, berries, whipping cream, berries, cake, etc.
10- Sprinkle raspberries or other berries over the bottom layer. I wish I had more to use but I didn't. So I'd recommend buying more than you think you'll need.
11- Line the perimeter of the cake with raspberries standing in a row. The order I used for the side/perimeter of this cake trifle was: jam on the bottom: 3 layers of chocolate and frosting cake around the rim/perimeter, raspberries stacked on top of the cake going around the perimeter of the trifle bowl, whipping cream, 3 layers of chocolate and frosting cake around the rim/perimeter, raspberries stacked on top of the cake going around the perimeter of the trifle bowl, whipping cream garnish.
12- Spoon the whipping cream into the dish.
13- Place another layer of cake into the dish.
14- Spread Jame
15- If you have enough fruit do another layer of fruit.
16- Spoon in whipping cream to form another layer.
17- Stop once in a while to clean the inside of the trifle dish so that it looks clean and clear.
18- Add another layer of cake above the whipping cream layer around the perimeter of the trifle dish.
19- Fill this layer of whipping cream with berries. As mentioned I didn't have enough raspberries as I just created this dessert off the cuff, so I used blackberries to fill this layer. They did taste great so adding blackberries is an option to add additional flavor to this dish.
20- Fill the middle with another layer of cake.
21- Cover the cake with jam.
22- Before adding the whipping cream, line the top perimeter cake with raspberries.
23- Add berries and whipping cream then chocolate cake then jam, berries, and whipping cream.
23- Make sure to carefully spoon the top layer of whipping cream in so it looks nice.
24- Garnish with a few raspberries and grated chocolate.
Notes
Note- Also, you may notice in the video that I'm taking off some frosting. This is because once I decided to make a layered cake trifle I worried about it being too rich. So where it made sense I did remove some frosting. When you make your layered chocolate cake leave the outside unfrosted/naked.
That's it. While it sounds confusing if you watch the video you will see that it is simply cutting and layering—which is easy.
This also may seem very time-consuming. I won't lie it is.
However, if you spread it out over a few days (bake the cake one day and allow it to cool, frost it another day and freeze it, then pull it out of the freezer and whip up the whipped topping and assemble the third day) it will not be so difficult.


For other ‘rich living tips’ please Subscribe Here or connect with me on these other platforms:
TikTok