• Skip to primary navigation
  • Skip to main content
  • Skip to primary sidebar
  • Skip to footer

Live Like You Are Rich

on any income...

  • Finances
    • Save Money
    • Make Money
    • The Credit Game
    • Couponing
    • Tips & Warnings
    • Financial Fitness Bootcamp Course
  • LOVE with Family
    • Love
    • Pregnancy & Postpartum
    • Parenting
    • Faith
    • The Random & Important 
  • Home Improvements
    • Preparedness
    • Organization & Cleaning
    • Efficiency
    • Interior Design
    • Home Updates
    • Home One
    • Home Two
    • Home Three
  • DIY & Crafts
    • DIY’s & Crafts
    • Holidays
    • Valentines
    • Easter
    • 4th of July
    • Halloween
    • Thanksgiving
    • Christmas
  • Our Favorite Recipes
    • Quick and Easy Family Favorites
    • Breakfast
    • Lunch
    • Starters, Soups & Salads
    • Dinner
    • Desserts
    • Smoothies & Drinks
  • Hosting
  • My Book

Burlap Easter Bunny Banner

February 20, 2014 By: Anita

Share to Your Social Media

  • Share
  • Tweet

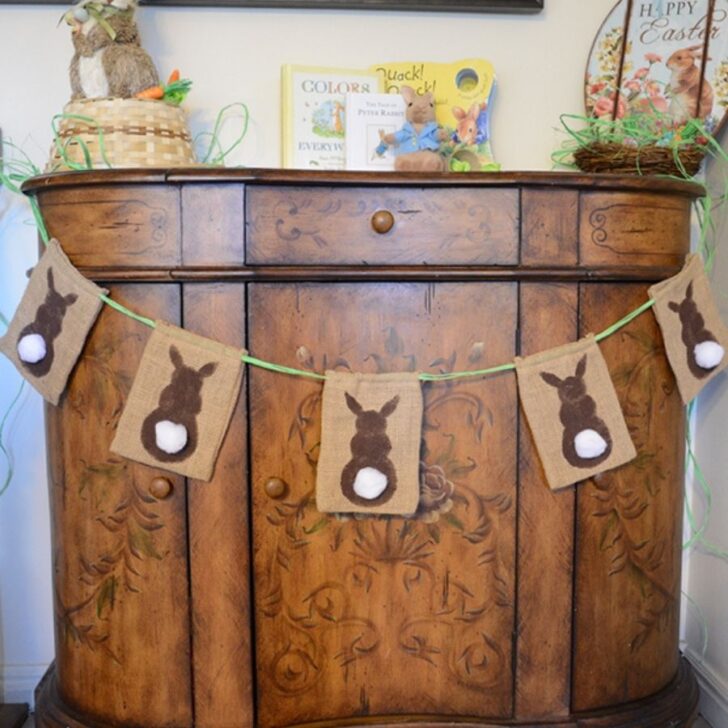
Recently, I made this burlap Easter bunny banner. And I just love it. Although I wanted to hold off, I couldn’t wait until closer to Easter to share it with you.

It was very easy to make (little to no craft experience needed) and took me about 30 minutes. And it was super inexpensive!

First, you need to get the supplies (listed below). On thick paper or scrapbooking paper (as I used) draw a bunny. I drew a snowman and added bunny ears. Once it looks like the bunny you want, cut the inside out with scissors making a stencil. Next, paint with any kind of craft paint and any color you want. I used a dark brown craft paint that was on sale for a dollar.

Dab the paint heavily and make sure to have something under the burlap to protect your table or table cloth from getting paint on it. If you want to use this banner (the other side of the sack) for another holiday you will want to put something (maybe cardstock or paper) in the sack to protect the other side from getting paint on it.

Burlap Easter Bunny Banner

Next, use a glue gun and glue the cotton tail on the rabbit.

Burlap Easter Bunny Banner

Once they have dried (or while they are still drying – just be careful) you will need to feed the grass through the burlap sacks (choose the strongest end of the grass and feed it through).

Burlap Easter Bunny Banner

Next use a cool glue gun, or a hot one, but just use a tiny bit and glue a piece of strong thick grass to the one you have already fed through the burlap sack and pull the one to bring the other through. I just used two strands of Easter grass from Dollar Tree. It needs to be a thick and pretty strong variety.

Burlap Easter Bunny Banner

Depending on how long the grass is and the desired length of the banner you can glue two more pieces of grass together (all four) and I pulled all four into the center burlap bag so you can’t see the joining spot.

Burlap Easter Bunny Banner

And you are done! This is a versatile banner. I used it for a recent Peter Rabbit baby shower I threw for a friend.

Burlap Easter Bunny Banner

List of Supplies:

Craft Paint-I bought mine at Michael’s but it can be found here

Burlap sacks-I bought mine at Michael’s but they can be found here. These may be hard to find. I bought the last ones that were at Michael’s. They actually have a heart on the back of them (they were a valentines clearance item). Amazon may be the best way to go unless you know that your craft store carries them.

Blotting sponge brush-I bought mine at Hobby Lobby but it can be found here.

Scrapbook paper or cardstock- most stores carry this.

Easter Grass- I got mine at Dollar Tree-it was a vintage green color. Get thick paper-ish kind (not the plastic thin kind that you often see in Easter baskets).

Cotton balls/pompoms- I bought mine at Michael’s but you could use cotton balls or use yarn and make it into a cotton ball.

Burlap Easter Bunny Banner

Happy Easter!

This darling  Burlap Table Runner at EclecticallyVintage was my inspiration.

Burlap Easter Bunny Banner

And I was just surfing Pinterest the other day when I saw a very similar craft. At first, I thought the creator of the craft had used my banner as her inspiration because they are so similar. But after clicking through and realizing that Ruth from LivingWellSpendingLess made it, I saw that she had come up with the idea before I did. She did an excellent job and hers turned out super cute! Check it out here.

Burlap Easter Bunny Banner

Anitasignature

For other ‘rich living tips’ and inexpensive crafts please subscribe, like me on Facebook, and follow me on  Pinterest and  Instagram.

How to Make Burlap Bunny Banner in 30 Minutes


Related posts:

How to Make an American Flag Easy No-Sew Banner How to Make a Reusable Party Banner Peter Rabbit Baby Shower
Previous Post: « 11 Ways to Throw a Baby Shower for Less than $50.00
Next Post: Peter Rabbit Baby Shower »

Reader Interactions

Comments

  1. Kelly @ Eclectically Vintage says

    February 21, 2014 at 9:04 pm

    Super cute! Love the Easter grass as the string!
    Kelly

    Reply
    • Anita Fowler says

      February 21, 2014 at 11:46 pm

      Kelly,

      Thanks for the comment! and for inspiring this in the first place! Your bunny table runner is great for Easter or any other time. It’s darling.

      Anita

      Reply
  2. Rebecca says

    March 2, 2014 at 12:50 am

    Super cute! I am going to make this for Easter! Now to find burlap…

    Reply
    • Anita Fowler says

      March 2, 2014 at 1:12 am

      Thanks! I found mine at Michaels 🙂

      Reply
  3. Laurie @ BetterBeeDaily says

    March 6, 2014 at 3:04 am

    This really is such a cute and clever idea! Darling!

    Reply
  4. Trish F says

    March 12, 2014 at 3:56 am

    Oh so cute. I have burlap on my shopping list for some picture frames I’m going to experiment with, I’ll look for the sacks. Thanks for the inspirational post, I think I’ll be heavily decorating this season.

    Reply
  5. md kennedy says

    March 30, 2014 at 12:00 pm

    This is so adorable and I love the rustic look. I can see doing this for other types of banners as well.

    Reply
  6. Ally says

    March 16, 2017 at 5:51 pm

    This is adorable! #thursdayfavoritethings

    Reply
    • Anita Fowler says

      March 21, 2017 at 10:42 pm

      Awe thank you!

      Reply

Trackbacks

  1. Peter Rabbit Baby Boy Shower | Hello Brielle! says:
    July 3, 2015 at 12:21 am

    […] adorable banner was DIYed by a talented friend for the shower. See the tutorial here from Live Like You Are […]

    Reply

Leave a Reply Cancel reply

Your email address will not be published. Required fields are marked *

Primary Sidebar

Anita Fowler
Pinterest Facebook Twitter Youtube Gmail Gmail RSS

Most Popular


Footer

anita_livelikeyouarerich

How to live a rich life on any income. Stay-at-Home Mom to 4. 👦🏻👩🏻👧🏼👶🏻Wife 👩‍❤️‍👨Author 📖. Blogger 💻. Christian 🌟. #livelikeyouarerich #LivingRichTips

Family & Finances & Food-Anita
Behind the Scenes of Decal Detachment: Sharing the Behind the Scenes of Decal Detachment: Sharing the methods we use to remove stucco key stone decals effortlessly! 

Check out the link in the bio.

https://livelikeyouarerich.com/how-to-remove-stucco-key-stone-decals/

#stuccodecal #stucco #decal #stuccokeystones #exteriordecor #exterior #houseexterior #homerenovation #houseremodel
This is a tutorial on how to seal copper gutters t This is a tutorial on how to seal copper gutters to keep them from turning brown. This is the exterior renovation we did two years ago. My gutters took about 4 hours to seal and have been great for the past 2 years.

Share this tutorial to someone who might need it.

Link in bio.

https://livelikeyouarerich.com/how-to-seal-copper-gutters-to-keep-them-from-turning-brown/

#coopergutter #copper #gutter #coppergutter #diyprojects #diyexterior #fronthouse #diyhomeimprovement #homedecor
There are a lot of things you can do to make paint There are a lot of things you can do to make painting and stenciling more convenient, efficient, and not as messy. Here are 11 steps to take to paint and stencil an entire room.

Check out the instructions in the link in the bio.

http://livelikeyouarerich.com/how-to-paint-and-stencil-entire-rooms/ 

#homeupdates #nurseryroom #stencil #painting #homedecorating #diydecor #walldecor #roomdecor #homedecor #decor #diyprojects #diy #crafts #holidays #savemoney #craftymom #frugalliving
Here is a tutorial on how to make a ballerina tull Here is a tutorial on how to make a ballerina tulle crib skirt. Cute and girly way to dress up a crib. 

Share this with someone who might need it.

Click the link in the bio to get the step-by-step instructions.

https://livelikeyouarerich.com/how-to-make-a-ballerina-tulle-crib-skirt/

#ballerinatullecribskirt #ballerinatulle #diyproject #diy #crafts #nurseryroomdecor #nursery #decoration #momlife #motherhood #homedecor
Indulge in layers of moist cake, rich frosting, an Indulge in layers of moist cake, rich frosting, and woodland-inspired decorations for my son’s Woodland Birthday Party. 🎂🌿 

Check out the recipe in the link in bio.

#WoodlandBirthdayParty #TreeStumpCake #WhimsicalDesserts #MagicalDelights #PartyPerfection #birthdaycakes #birthdaycake #birthdaycakeideas #firstbirthdaycake #birthdaycake🎂
Feast your eyes on this Delicious Cheese and Tomat Feast your eyes on this Delicious Cheese and Tomato Mushroom Delight! 🍄✨ 

Indulge in the perfect combination of savory cheese and juicy tomatoes beautifully arranged for our Woodland Birthday Party. Get ready to savor the flavors of nature! 🌿🧀🍅 

Read on for an easy step-by-step guide to creating this show-stopping display! Link in bio.

#WoodlandBirthdayParty #cheeseandtomato #mushroomdelight #cheesyfood
Load More... Follow on Instagram

Links

  • About Me
  • Contact Me
  • Privacy Policy
  • Advertising/Media/Marketing Opportunities on LiveLikeYouAreRich.com

Disclosure Policy

Affiliate links may be used in this post. Printing a coupon or ordering a product through this link may result in a commission, which helps pay for the cost of running this site and keeps the content free. Read my full disclosure policy here.

Copyright © 2023