• Skip to primary navigation
  • Skip to main content
  • Skip to primary sidebar
  • Skip to footer

Live Like You Are Rich

on any income...

  • Finances
    • Save Money
    • Make Money
    • The Credit Game
    • Couponing
    • Tips & Warnings
    • Financial Fitness Bootcamp Course
  • LOVE with Family
    • Love
    • Pregnancy & Postpartum
    • Parenting
    • Faith
    • The Random & Important 
  • Home Improvements
    • Preparedness
    • Organization & Cleaning
    • Efficiency
    • Interior Design
    • Home Updates
    • Home One
    • Home Two
    • Home Three
  • DIY & Crafts
    • DIY’s & Crafts
    • Holidays
    • Valentines
    • Easter
    • 4th of July
    • Halloween
    • Thanksgiving
    • Christmas
  • Our Favorite Recipes
    • Quick and Easy Family Favorites
    • Breakfast
    • Lunch
    • Starters, Soups & Salads
    • Dinner
    • Desserts
    • Smoothies & Drinks
  • Hosting
  • My Book

Easy Ribbon Wreath For the 4th of July

July 1, 2018 By: Anita

Share to Your Social Media

  • Share
  • Tweet

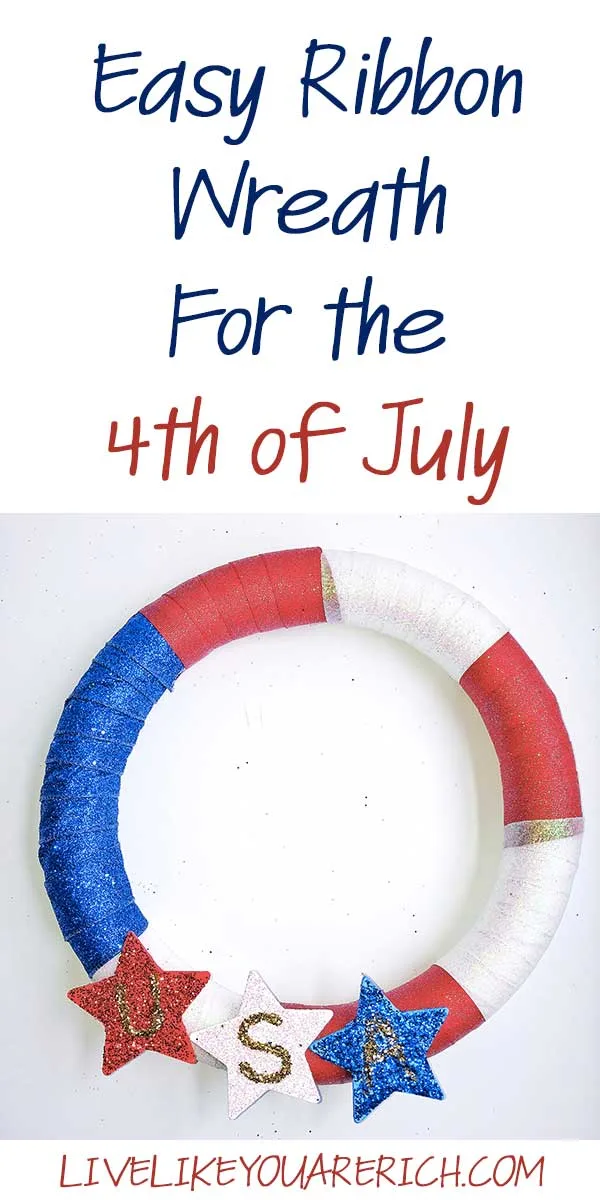
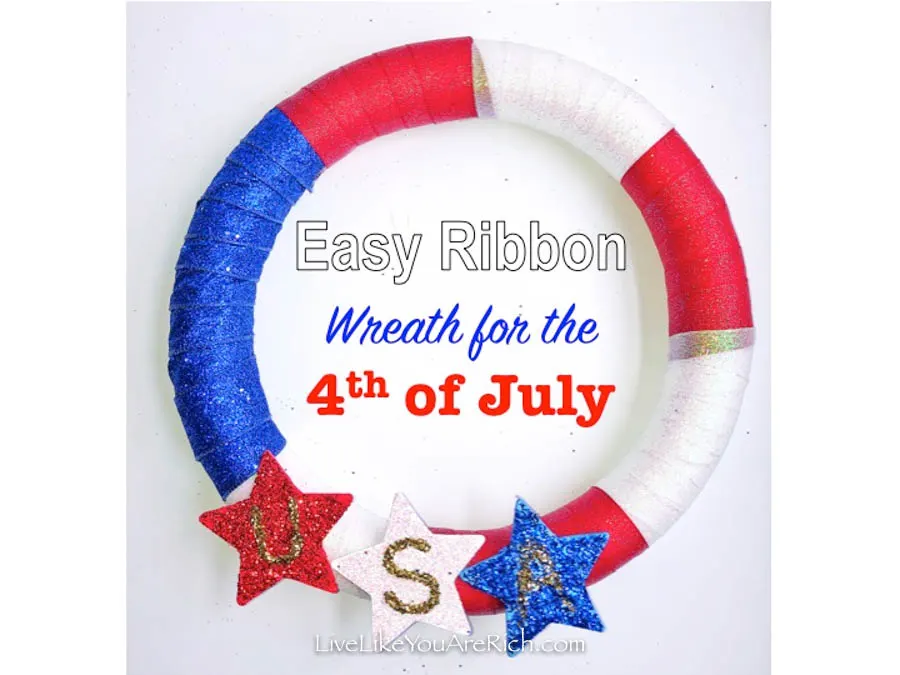
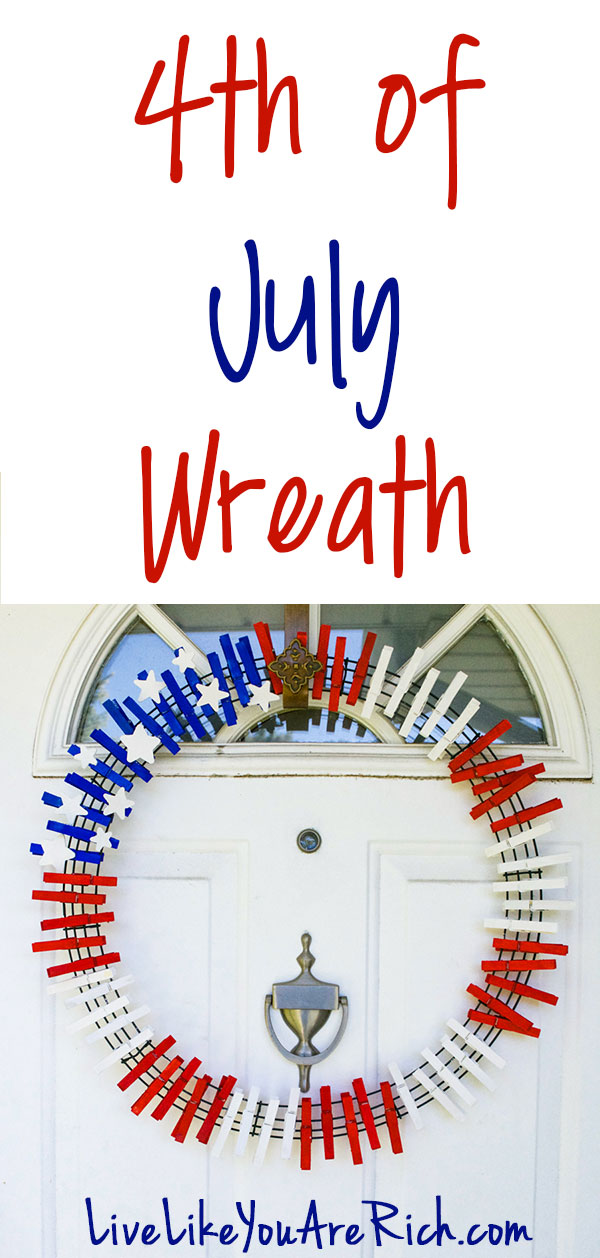
My friend Brandi made this cute Easy Ribbon Wreath for the 4th of July! Not only is it simple to make, it is also inexpensive.

Easy Ribbon Wreath For the 4th of July Hi, I’m Brandi. I love summer crafting. I have found that there are so many fun options of crafts to make! I enjoy getting the kids involved with my summer projects. This month hosts a great patriotic holiday; so I figured I should make something to express our pride.

However, I didn’t want to break the bank or do anything too time consuming. I am nuts about burlap as the next crafter (and in particular as a Southern woman), but making burlap ribbon look cute just takes time I didn’t have. I still went with ribbon, just a different type.  This cute Easy Ribbon Wreath for the 4th of July was super simple to make and cost me less than $20!

Supplies Needed

Round foam wreath

Wooden star cutouts

1 spool each of red, white, and blue ribbon (I chose ones that glittered)

White school glue

Hot glue

Glitter (red, iridescent, blue, and gold)

Acrylic paint (red, white, and blue)

Paint brush

I already had the white glue, the hot glue, glitter, acrylic paint, and paint brush at home, so I didn’t have to purchase those this time.

Step 1

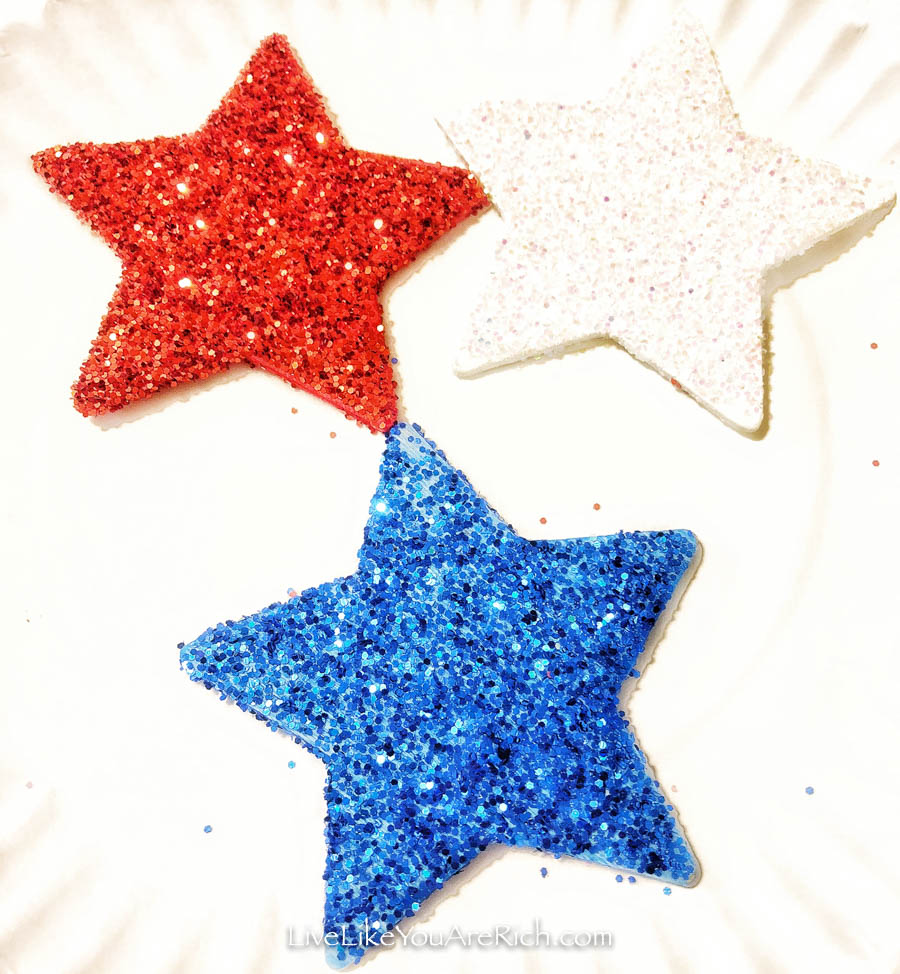
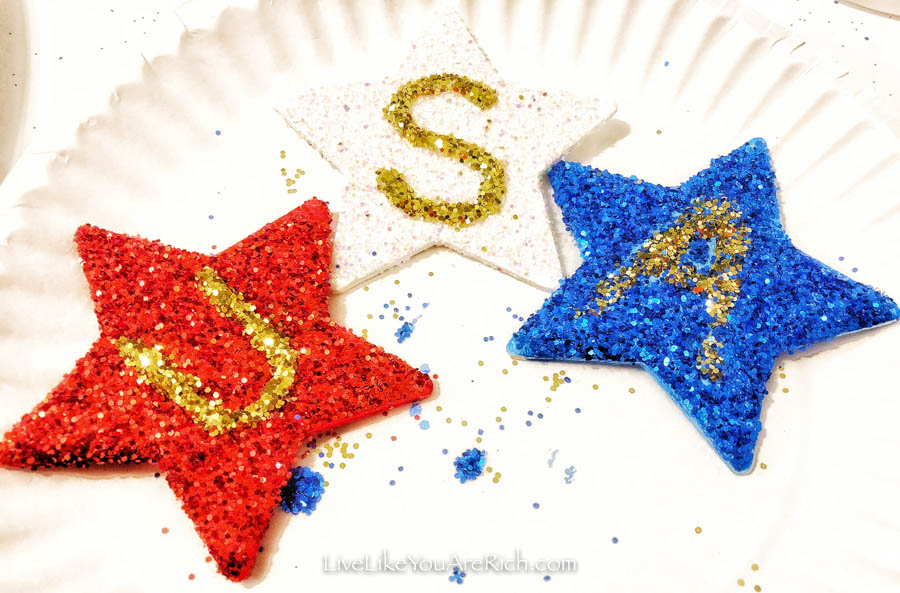
Paint 3 stars, one each of red, white, and blue. While the paint is still wet, sprinkle the stars with their corresponding glitter color. Shake the excess glitter off and allow the paint to dry while you carry out the other steps. I allowed my stars to dry on a paper plate while I did the next steps. 

Easy Ribbon Wreath For the 4th of July

Step 2

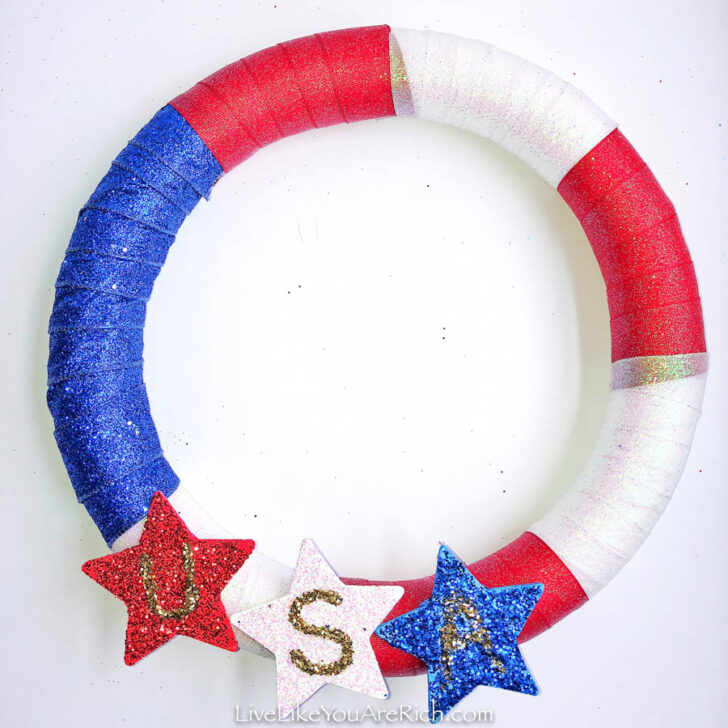
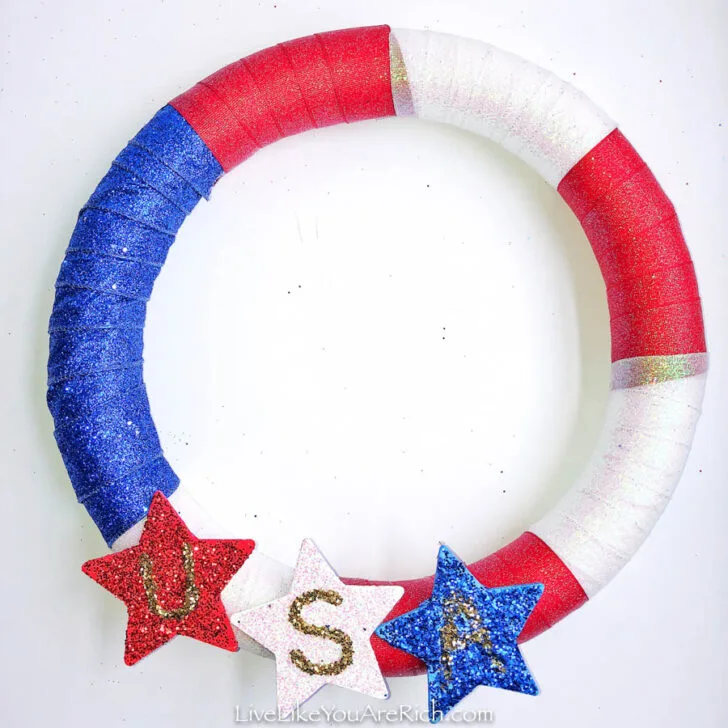
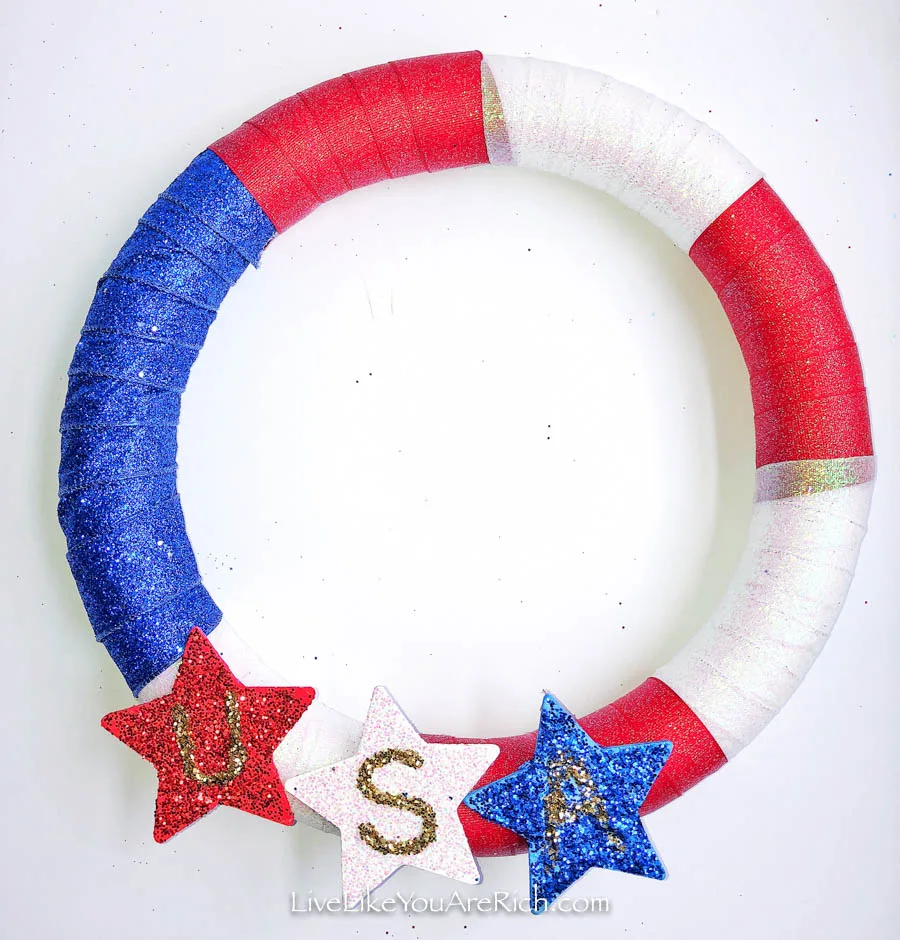
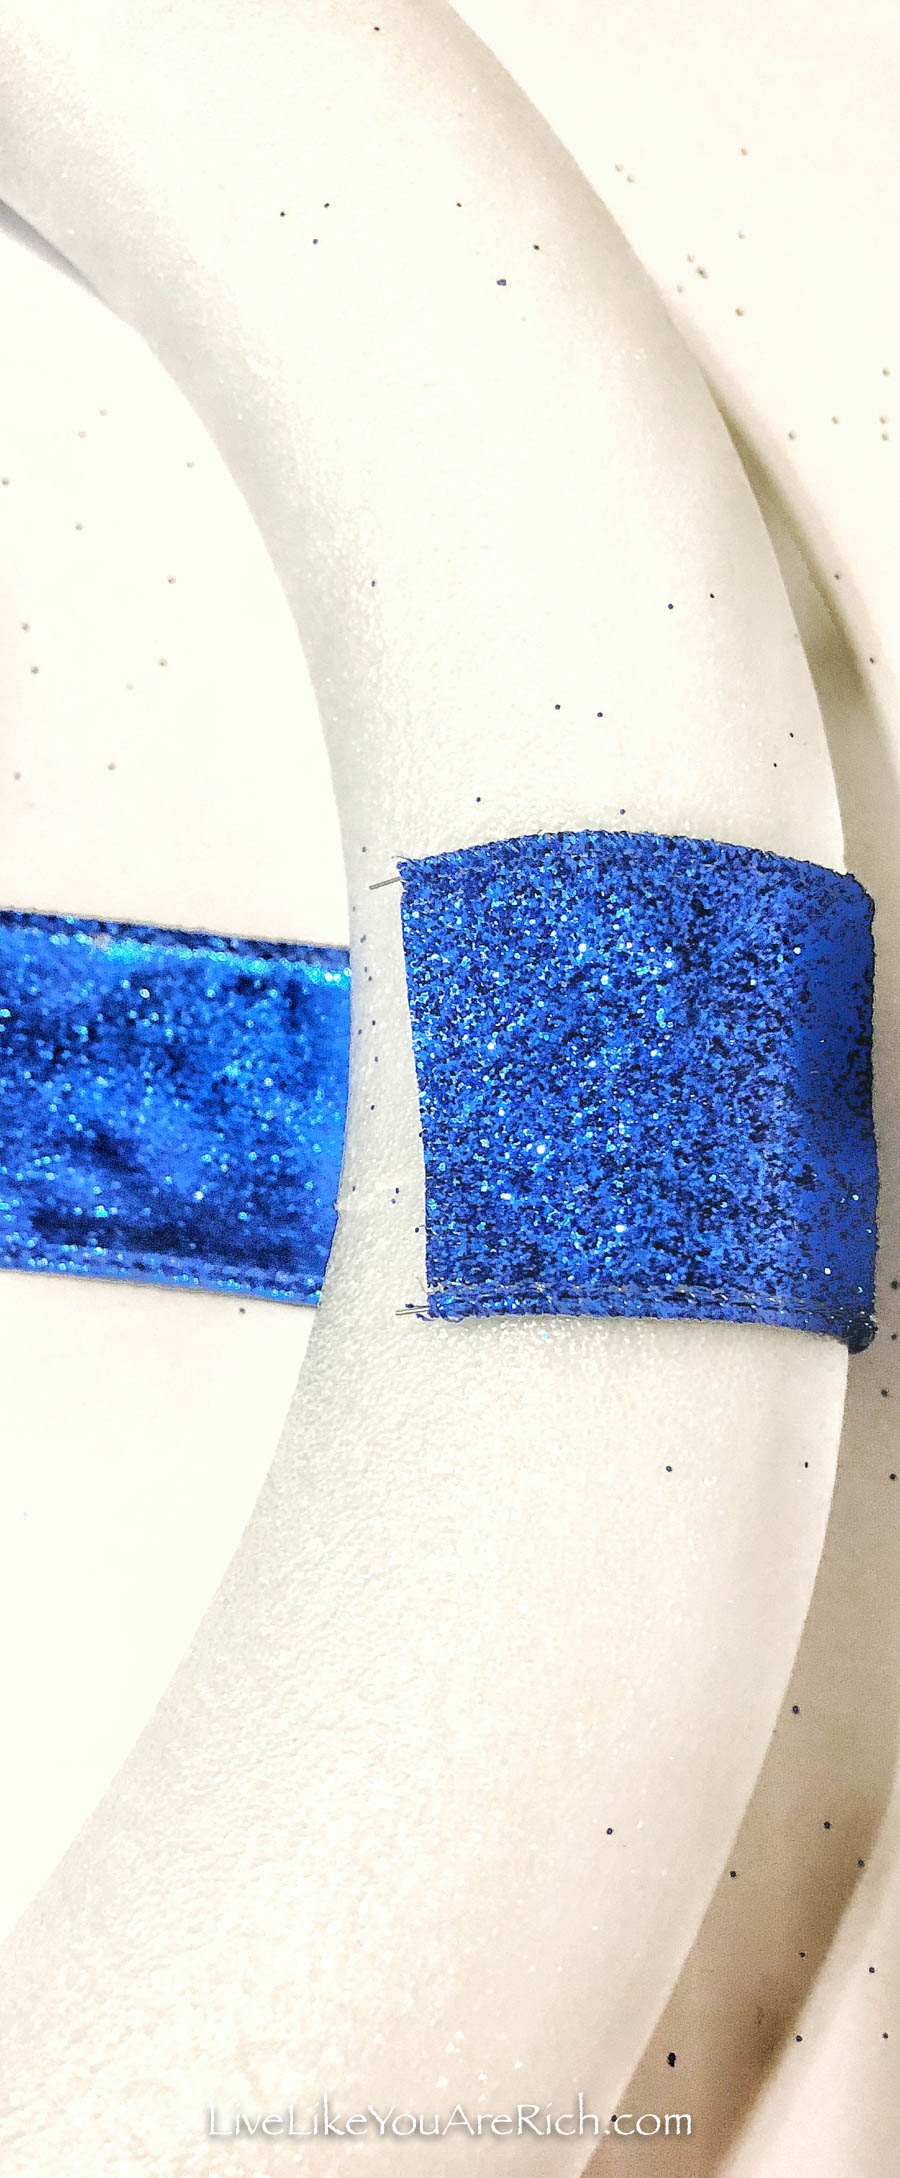
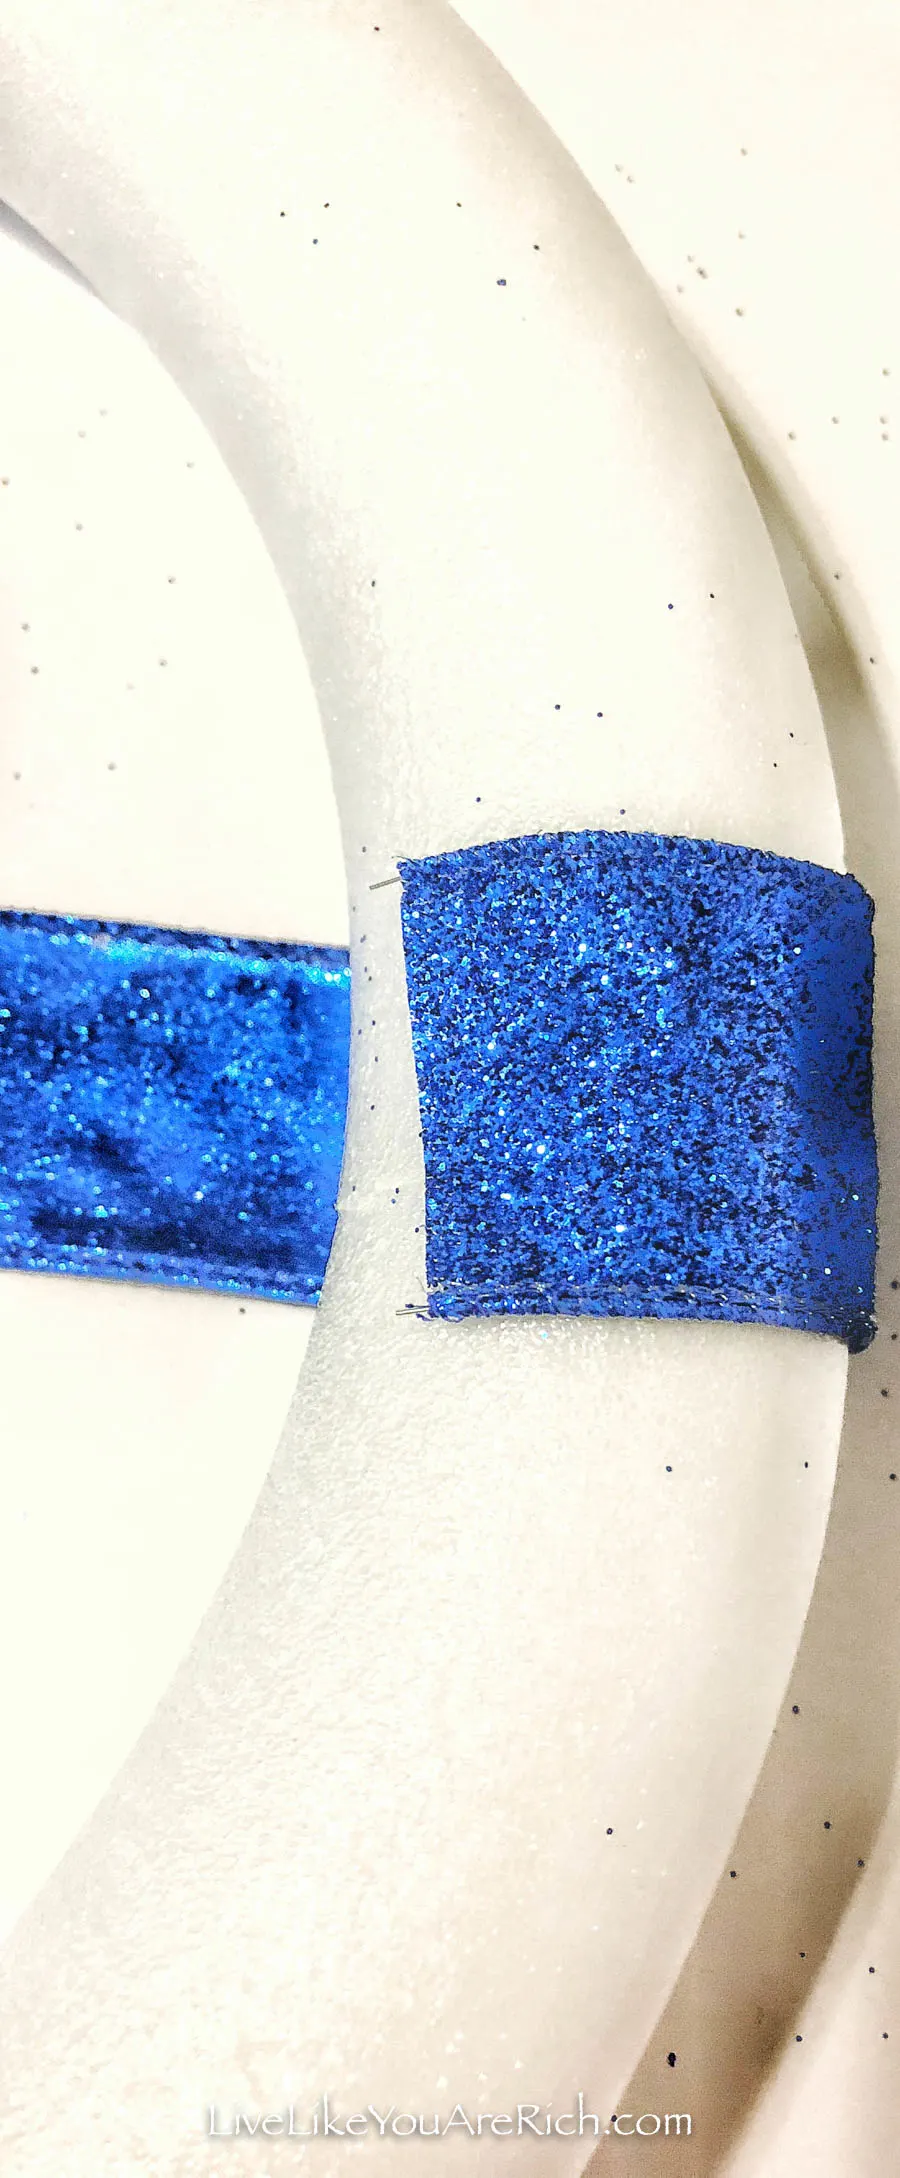
Hot glue one end of your blue ribbon to the wreath. It works best if you try to glue it to the inner part of the wreath so that the end of the ribbon doesn’t show as you look directly at the wreath. 

Easy Ribbon Wreath For the 4th of July

Step 3

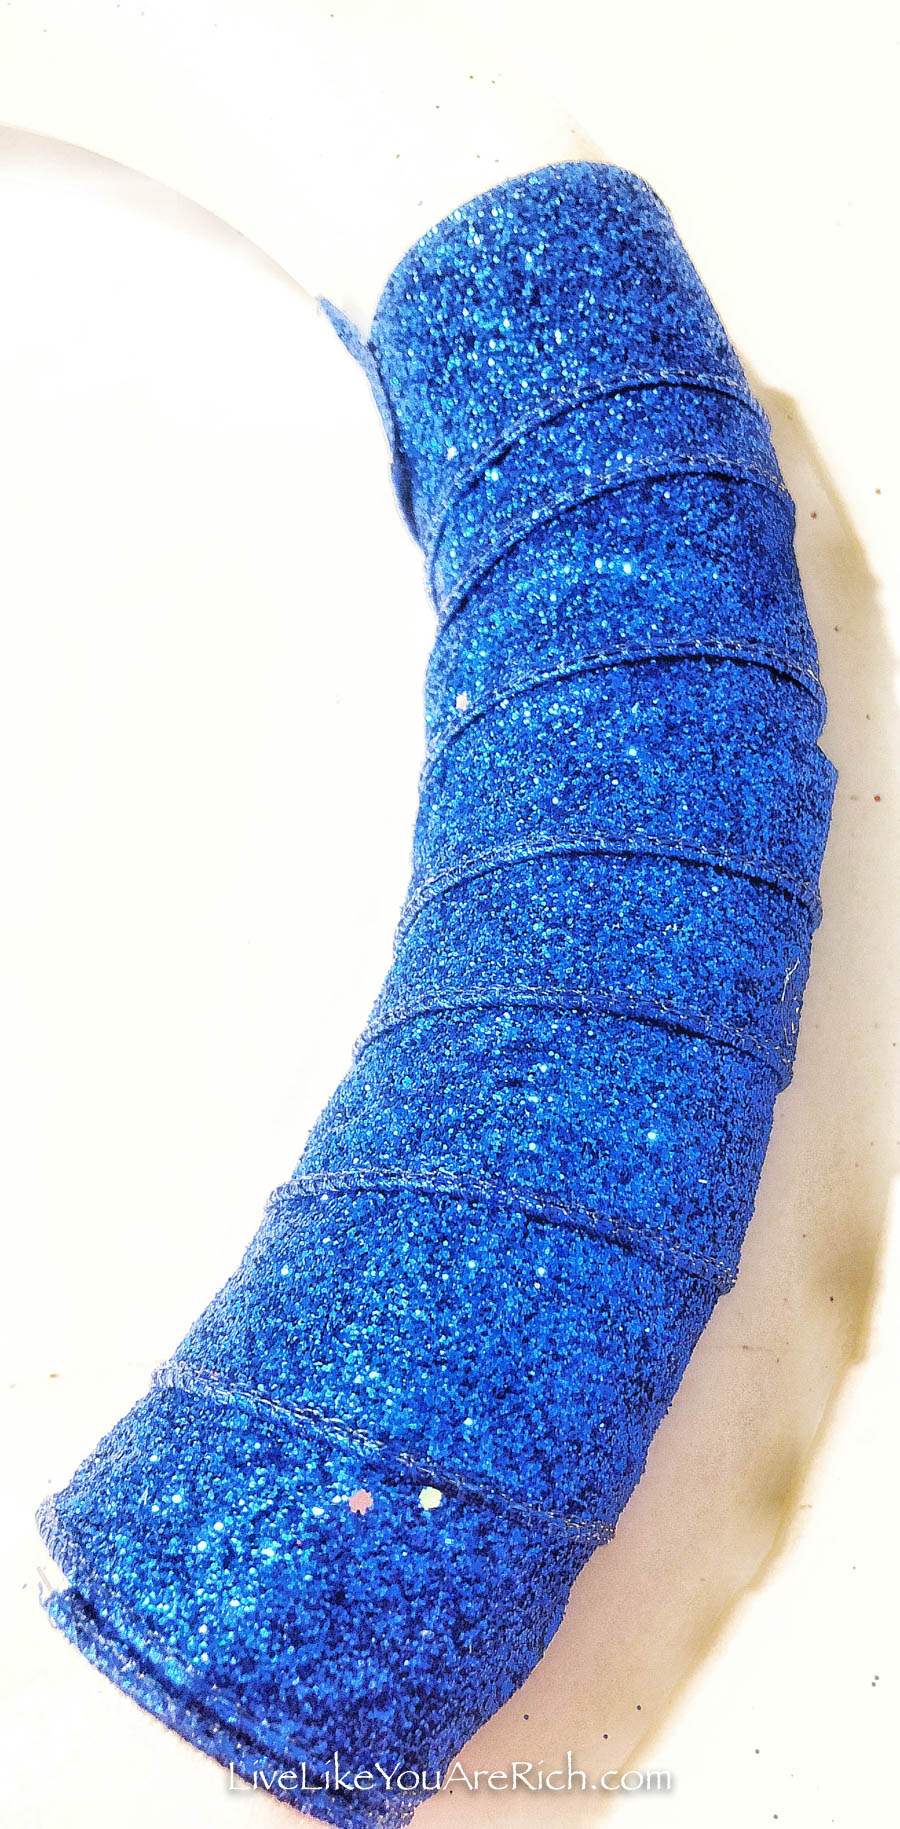
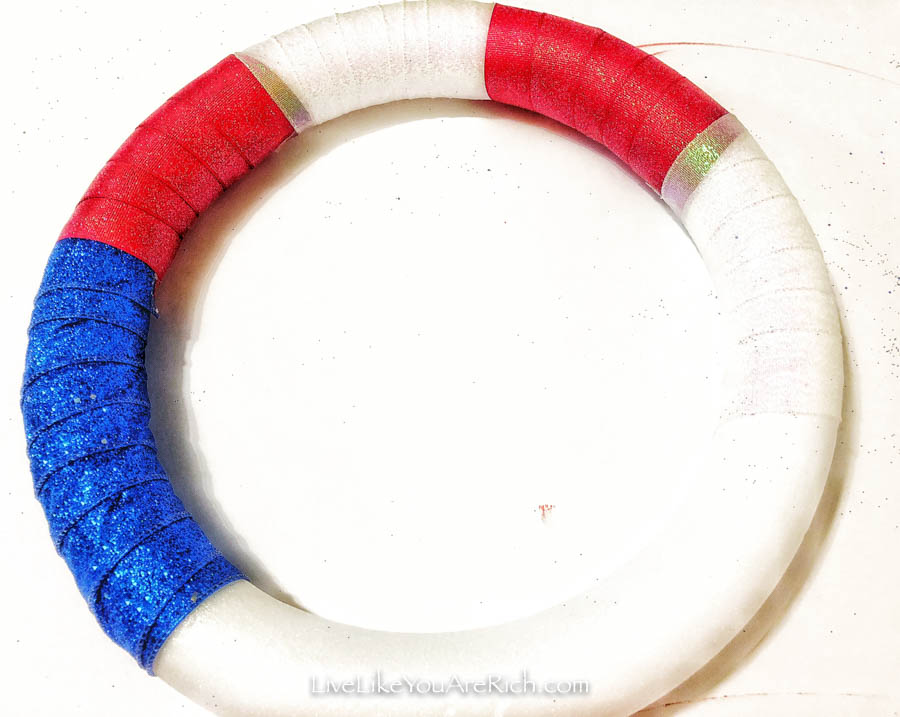
Start wrapping the ribbon around the foam wreath. Try to stagger it and pull it tightly as you go. You want the blue section to be your largest individual block of color. Once it’s the desired length, cut the other end and hot glue that section to the wreath as well. 

Easy Ribbon Wreath For the 4th of July

Step 4

Now, it’s time to do the same thing with your red and white ribbons. Remember, you want the red and white sections to be smaller than the blue, so try to wrap about half as much red or white ribbon as blue ribbon each time. 

Easy Ribbon Wreath For the 4th of July

Step 5

Once you have the entire wreath covered in ribbon, your stars should be dry. Use white school glue to write a U on one star, an S on another, and an A on another. Sprinkle gold glitter on the letters, shake off the excess, and allow them to dry overnight. 

Easy Ribbon Wreath For the 4th of July

Step 6

Hot glue your stars on your wreath, and you are ready to hang it wherever you’d like! Just to be on the safe side, since it is foam and ribbon, you may want to keep it away from moisture. I have mine hanging on my door. 

Easy Ribbon Wreath For the 4th of July

I definitely feel more festive now, and I even got some ideas for some other patriotic decorations as I was making this guy. And if you want to go even more celebratory, you could add in some battery operated lights or some bead necklaces in alternating colors to wrap around the wreath as well. In my perfect world, I’d find a way to add even more glitter!

I hope you have fun making this easy, 1-hour craft. This is something the kids will love to help with, and it is a good time to give a little history lesson about our country.


What are your plans for the upcoming holiday? What do you tell your kids about the 4th of July? I’d love to hear your ideas!

With love and blessings,

Brandi

For other ‘rich living tips’ please subscribe, like me on Facebook, and follow me on Pinterest and Instagram.

Easy Ribbon Wreath For the 4th of July

You may also like…


Related posts:

How to Make a Dollar Store Christmas Wreath Default ThumbnailEasy D.I.Y. $3.50 Wreath How To Make a Mr. Fredricksen Costume from the Movie ‘UP’.
Previous Post: « 15 More Top Board Games for 5 and Under
Next Post: Quick Cream Cheese Yogurt Fruit Dip »

Reader Interactions

Comments

  1. bestessaywritingservice.co says

    July 19, 2018 at 6:14 am

    The ribbon wreath is very cute and looking great look also. It is containing very simple work and enjoy for the children from this. The holiday time it is really nice to play for kids. The each products are getting different color and easy to make it. The ribbon is getting great worth from children and excess glitters are accept. The step by step concept to be involved for making this. Thanks for given great post for me. I am very excited for paints and color in ribbon. Really nice product.

    Reply

Leave a Reply Cancel reply

Your email address will not be published. Required fields are marked *

Primary Sidebar

Anita Fowler
Pinterest Facebook Twitter Youtube Gmail Gmail RSS

Most Popular


Footer

anita_livelikeyouarerich

How to live a rich life on any income. Stay-at-Home Mom to 4. 👦🏻👩🏻👧🏼👶🏻Wife 👩‍❤️‍👨Author 📖. Blogger 💻. Christian 🌟. #livelikeyouarerich #LivingRichTips

Family & Finances & Food-Anita
I’ve made this DIY Isabela Encanto Barbie Cake f I’ve made this DIY Isabela Encanto Barbie Cake for my daughter's birthday! 

Learn the Step-by-Step Process to Craft a Stunning Cake Inspired by the Enchanting World of Isabela Encanto. Perfect for Birthdays, Celebrations, and Unleashing Your Inner Cake Artist!

Try it! Get the recipe on the link in bio.

https://livelikeyouarerich.com/isabela-encanto-barbie-cake/

#IsabelaEncanto #BarbieCake #DIYCakes #birthdaycake #cake #birthdayparty #encantocake
I love these memory foam side table toppers! They I love these memory foam side table toppers! They can hold a lamp, books and other items I want to set on them yet are cushiony for my kids.

http://livelikeyouarerich.com/diy-memory-foam-side-table-toppers/ 

#sidetable #sidetables #memoryfoam #roomdecorationonabudget #diyproject #diy #crafts #decoration #homedecor #onabudget #budget #decorate
Behind the Scenes of Decal Detachment: Sharing the Behind the Scenes of Decal Detachment: Sharing the methods we use to remove stucco key stone decals effortlessly! 

Check out the link in the bio.

https://livelikeyouarerich.com/how-to-remove-stucco-key-stone-decals/

#stuccodecal #stucco #decal #stuccokeystones #exteriordecor #exterior #houseexterior #homerenovation #houseremodel
This is a tutorial on how to seal copper gutters t This is a tutorial on how to seal copper gutters to keep them from turning brown. This is the exterior renovation we did two years ago. My gutters took about 4 hours to seal and have been great for the past 2 years.

Share this tutorial to someone who might need it.

Link in bio.

https://livelikeyouarerich.com/how-to-seal-copper-gutters-to-keep-them-from-turning-brown/

#coopergutter #copper #gutter #coppergutter #diyprojects #diyexterior #fronthouse #diyhomeimprovement #homedecor
There are a lot of things you can do to make paint There are a lot of things you can do to make painting and stenciling more convenient, efficient, and not as messy. Here are 11 steps to take to paint and stencil an entire room.

Check out the instructions in the link in the bio.

http://livelikeyouarerich.com/how-to-paint-and-stencil-entire-rooms/ 

#homeupdates #nurseryroom #stencil #painting #homedecorating #diydecor #walldecor #roomdecor #homedecor #decor #diyprojects #diy #crafts #holidays #savemoney #craftymom #frugalliving
Here is a tutorial on how to make a ballerina tull Here is a tutorial on how to make a ballerina tulle crib skirt. Cute and girly way to dress up a crib. 

Share this with someone who might need it.

Click the link in the bio to get the step-by-step instructions.

https://livelikeyouarerich.com/how-to-make-a-ballerina-tulle-crib-skirt/

#ballerinatullecribskirt #ballerinatulle #diyproject #diy #crafts #nurseryroomdecor #nursery #decoration #momlife #motherhood #homedecor
Load More... Follow on Instagram

Links

  • About Me
  • Contact Me
  • Privacy Policy
  • Advertising/Media/Marketing Opportunities on LiveLikeYouAreRich.com

Disclosure Policy

Affiliate links may be used in this post. Printing a coupon or ordering a product through this link may result in a commission, which helps pay for the cost of running this site and keeps the content free. Read my full disclosure policy here.

Copyright © 2023